Friday 18 March 2016

Baby blanket - Ho Ho Ho and on We Sew

Welcome to Ho Ho Ho and on We Sew in March! Fiona at Celtic Thistle Stitches hosts a monthly link party to help people get prepared for Christmas and there are always some great ideas and inspiration to be found. If like me you often end up a week before Christmas with a long list of handmade gifts that have not come to fruition, then fear no more. Starting to plan in March might seem odd but how smug will you feel come December! 

I am very excited about my make for this month as it is a first for me in more ways than one. It's a quilt and it's for a baby! I am getting to the age where my friends are settling down and this year one of my oldest friends who I have known since I was 9 is having a baby. This will be the first time that one of my close group of friends from school is pregnant and so I finally have the excuse to make cute baby things!

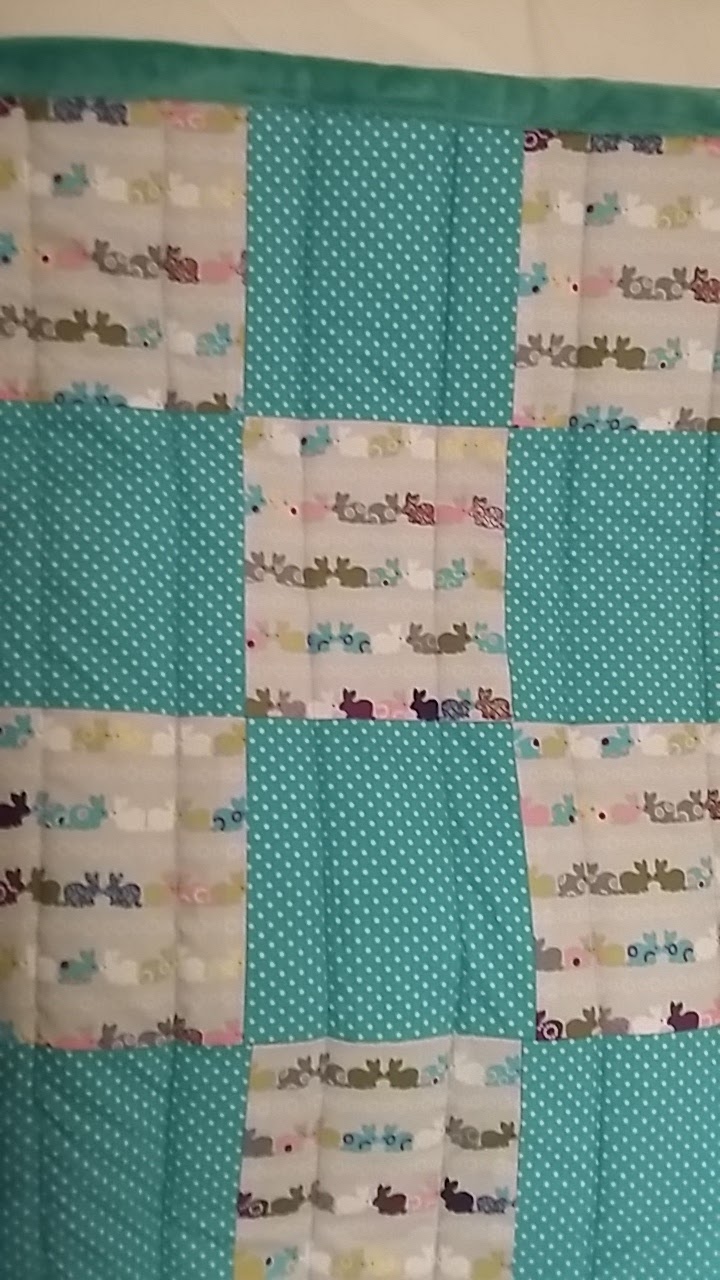
I had some beautiful rabbit print material (I have a lot of rabbit material!) and I decided that I would like to try to make a patchwork quilt. My mother-in-law is an expert quilt maker and has made all sorts of elaborate quilt patterns, but I decided to play it safe. I used just two materials to create a patchwork design and then did a basic vertical line to secure the materials and to add texture.


Firstly I cut 20cm squares of the constrasting materials and pinned and sewed them together.

I then measured and cut a rectangle of wadding material and backing material the same size as my completed patchwork and pinned these three materials together.

I sewed vertical lines down the length of the quilt at regular intervals to secure and add texture.


For the bias binding I found a turquoise fleece material which is so soft and makes a lovely edge for a baby blanket.

And here is the finished quilt. I think it will work well for a boy or a girl so I have all bases covered for Christmas!


This month for the Ho Ho Ho giveaway we have these beautiful sewing-themed charms from Nicole de Bruin which will be spilt between two winners.


To be in with a chance of winning just link up your Christmas and Holiday makes below. Two lucky winners will be randomly drawn when the link party closes at midnight on March 31st.


Thanks to these generous sponsors who make the monthly giveaways possible.


https://www.etsy.com/uk/shop/nicoledebruin
  

http://www.needcraft.co.uk/
http://www.elephantinmyhandbag.com/http://www.tikkilondon.com/http://www.japancrafts.co.uk/http://www.rylandpeters.com/
 
https://www.etsy.com/uk/shop/summersville
https://www.etsy.com/uk/shop/AngieAttwoodTextiles

http://simplysolids.co.uk/
http://sewsweetness.com/

 
http://www.tina-francis-tapestry.co.uk/

Tuesday 2 February 2016

Decorating with a French style

We came back to England before Christmas for the holidays and brought all our things with us. Our 6 months out in France were probably the best we have ever had and we were sad to say goodbye! But 2016 is about moving to Bristol, finding jobs and getting settled and it will hopefully be a very exciting year. 2015 will take some beating though!

When we were living in France my husband and I did various alterations and decorations to my in-laws house. We did a lot of painting, ripping up of carpet, laying new flooring and adding skirting boards. It was a lot of fun and we definitely improved our DIY skills. One of the things I most enjoyed decorating was an electricity board cover, (exciting right!) After some work had been done to the house the electricity box had been contained in a new plain wood box on the wall and after we had painted the walls it looked a bit bare.


My mother-in-law liked the idea of it having a newspaper background and we had plenty of newspapers in the house for making fires in the winter. We found some vintage style postcards from a Champagne producer in a drawer in the house and thought they would be perfect displayed on it. There were only a few but after searching for vintage french posters on Amazon I found some beautiful ones that fitted in.


I used all purpose wallpaper paste to glue the newspaper in place, it was like a huge papier mâché
and then once dried the posters and postcards were glued on top. It took a quite few days to do and I kept coming back to it with another pile of newspaper cuttings to glued on and being surprised at how little they covered! While not the quickest way to decorate a plain box or wardrobe that you might have, I think it definitely adds a lovely vintage French feel to the room.

Sunday 31 January 2016

Handmade Kindle Cover

This year I am excited to be part of Ho Ho Ho and on We Sew hosted by Fiona at Celtic Thistle Stitches. A monthly link party to keep you motivated to make those crafty gifts for Christmas that can very often get lost in the December rush. By making an item a month, come December you can sit back and relax, well that's the idea! I am hosting the March link party and have got my thinking cap on for that one! In the meantime I have been inspired by Fiona to start planning early this year as some presents I intended to make in 2015 have been rolled over to 2016.

http://celticthistlestitches.blogspot.co.uk/p/ho-ho-ho-and-on-we-sew-link-party.html

This month I have made a Kindle cover for my father-in-law, he is an avid reader and his current cover is getting a bit old so by December he will be in need of a new one. This will work for any e-reader or ipad and could be scaled down for a smart phone. I used a book-print material for this one but I made my brother-in-law one for last Christmas which had stags on which seems to fit the Christmassy theme better!


You will need:

Pellon -  (3 x width of kindle + 2") x (height of kindle + 2")
Outside material - 2 x size above
Bias-binding - 1½ inch wide strips
Button


Step 1 
Place the outsides right-side together and sew along the top long edge.

Step 2
Turn right side out and place pellon inbetween the fabric. Pin in place around edges and sew along the open edges.


Step 3
Using kindle to measure, fold right side over to form a pocket and pin and then sew in place along bottom edge.


Step 4
Sew buttonhole on outer flap.

Step 5
Pin and then sew bias-binding to cover the bottom and inside edges. Start with the inside edge of the pocket -the first time I did this the wrong way round and it meant I couldn't cover the edges with the other bias-binding, it took a long time to unpick!


Step 6
Sew on the button and you have a handmade kindle cover ready for Christmas!


Make sure you check out Fiona's page at Celtic Thistle Stitches for more links to Christmas and Holiday makes. One down, eleven to go!